
express框架
express框架相当于再http模块加上一个中间件合集。中间件的含义就相当于处理http请求的处理函数,而express相当于调用多个中间件,这么一个框架。
参考:
相关文档:
项目下载使用:
cnpm install express --save
express路由结构化
https://expressjs.com/zh-cn/guide/routing.html
express里http.createServer
const app = express()

app.use(bodyParser.json({ limit: ‘10mb’ }))
app.use(
  bodyParser.urlencoded({
    extended: false,
  })
)
const server = http.createServer(app)
第9行代码这样写好处有:
用http封装不但可以使用express的属性和方法,而且还可以使用http的属性和方法
具体可以参考这段讨论:express里http.createServer和app.listen有什么区别?
express 常用API
use方法和中间件
- 注册中间件,返回的是函数。注意第三个参数next,如果写
next()语句则执行完该中间件,前往下一个中间件执行下一个中间件,如果不写,则执行完该中间件,就停止运行中间件。 - 中间件,如果注册了路由,则只显示路由内容,所以使用的时候,中间件的url不应该是具体路由,而是一层路由,其他的二层路由则是具体内容路由。
let express = require('express')
let app = express()

// 路由
app.get(‘/‘, function (req, res) {
  res.send(‘Hello world’)
})
app.get(‘/customer’, function (req, res) {
  res.send(‘customer page’)
})
// app.get(‘/admin’, function (req, res) {
//   console.log(‘—————————-‘)
//   res.send(‘admin page’)
// })
// 中间件
// 如果注册了路由,则只显示路由内容
app.use(‘/admin’, function (request, response, next) {
  response.writeHead(200, { ‘Content-Type’: ‘text/plain’ })
  response.end(‘Welcome to the admin page!\n’)
})
app.listen(3000)
console.log(‘to http://localhost:3000/')
get方法
- 注册路由,用于指定不同的访问路径所对应的回调函数。由于get方法没有next回调函数,所以按照执行顺序,当地一个get方法执行了(根据匹配成功参数路径),后续的都不会执行了
put()post()put()del()类似get()使用(delete是JavaScript保留字,所以改叫del)
对于第一个参数,也就是路径参数,有不同的匹配规则
app.get('/customer/:who', function (req, res) {
  res.send('都能访问 /' + req.params.who + ' 该路径')
})
访问 http://localhost:3000/customer/fa 返回 都能访问 /fa 该路径
访问http://localhost:3000/customer/ad 返回 都能访问 /ad 该路径
不能访问http://localhost:3000/customer
如果是:who? 则成为可选路径
set方法
- 指定变量的值
// 告诉express框架模板的位置
app.set('views', path.join(__dirname, 'views'))
// 告诉express框架模板的默认后缀是什么
app.set('view engine', 'art');
response对象
response.redirect方法允许网址的重定向。
response.sendFile方法用于发送文件。
response.render方法用于渲染网页模板。
request对象
搭建HTTPS环境
上传crt和key文件
var fs = require('fs');
var options = {
  key: fs.readFileSync('E:/ssl/myserver.key'),
  cert: fs.readFileSync('E:/ssl/myserver.crt'),
  passphrase: '1234'
};

var https = require(‘https’);
var express = require(‘express’);
var app = express();
app.get(‘/‘, function(req, res){
  res.send(‘Hello World Expressjs’);
});
var server = https.createServer(options, app);
server.listen(8084);
console.log(‘Server is running on port 8084’);
express写API接口
References
response对象json方法写接口
内置json响应的方式:
/*
 * @Author: wztlink1013
 * @Date: 2022-01-11 11:04:38
 * @LastEditTime: 2022-01-11 11:21:17
 * @Description:
 */
let obj = {
  1: {
    id: 1234,
    name: '张三',
    college: '计算机科学与工程学院',
    grade: 2018,
    classes: 2,
    age: 21,
  },
  2: {
    id: 5678,
    name: '李四',
    college: '计算机科学与工程学院',
    grade: 2018,
    classes: 2,
    age: 21,
  },
}

exports.index = function (req, res) {
  res.status(200).json(obj)
}
// 接口的使用
let userinfo = require('./api/userinfo.js')
app.get('/api/userinfo', userinfo.index)
js使用接口的一些方法
跨域问题的解决
解法一:手写(但是有看到网上说会有设备(iPhone6)不兼容等问题)
// 跨域设置
app.all("*", function(req, res, next) {
    res.header("Access-Control-Allow-Credentials", true);
    res.header("Access-Control-Allow-Origin", "*");
    res.header("Access-Control-Allow-Headers", "X-Requested-With");
    res.header("Access-Control-Allow-Methods", "PUT,POST,GET,DELETE,OPTIONS");
    res.header("Content-Type", "application/json;charset=utf-8");
    next();
});
解法二:直接使用npm里面的cors包
<!--
* @Descripttion: learn axios
* @Date: 2021-12-21 09:40:36
* @LastEditTime: 2022-01-11 11:25:28
-->
<!DOCTYPE html>
<html lang="en">
<head>
<meta charset="UTF-8" />
<meta http-equiv="X-UA-Compatible" content="IE=edge" />
<meta name="viewport" content="width=device-width, initial-scale=1.0" />
<title>Document</title>
<script src="https://cdn.jsdelivr.net/npm/axios/dist/axios.min.js"></script>
</head>
<body>
<script>
// 配置公共的请求头
axios.defaults.baseURL = 'http://localhost:3000/'
// 配置 超时时间
axios.defaults.timeout = 2500
// 配置公共的请求头
// axios.defaults.headers.common["Authorization"] =
// "token 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"
// axios.defaults.headers.common["Accept"] = "application/vnd.github.v3+json"
// 配置公共的 post 的 Content-Type
axios.defaults.headers.post['Content-Type'] = 'application/json'
// 请求/响应 拦截器的配置
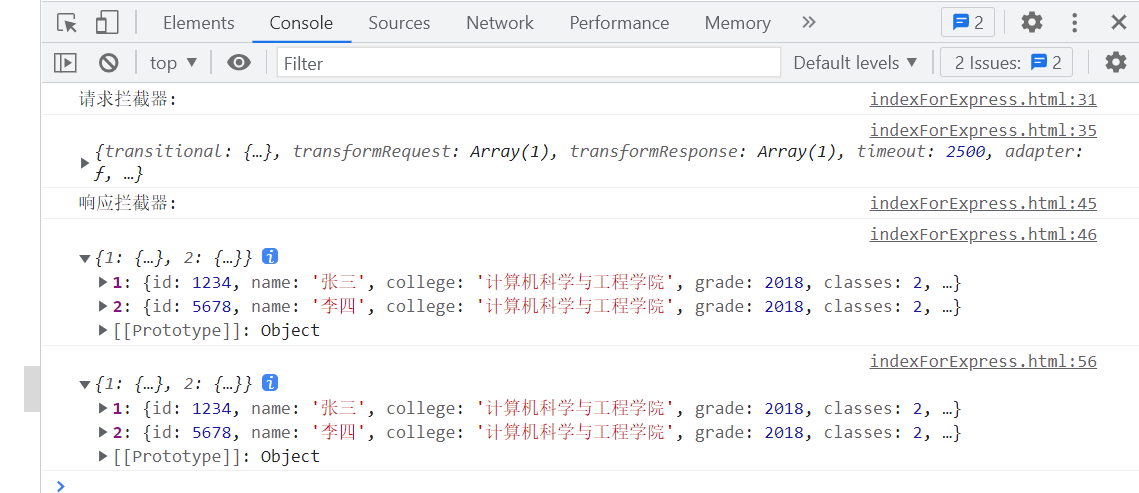
axios.interceptors.request.use(
config => {
console.log('请求拦截器: ')
config.headers.Accept = 'application/vnd.github.v3+json'
config.headers.Authorization =
'token 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'
console.log(config)
return config
},
err => {
console.log(err)
}
)
axios.interceptors.response.use(
data => {
console.log('响应拦截器: ')
console.log(data.data)
return data.data
},
err => {
console.log(err)
}
)
// 请求数据
axios.get('api/userinfo').then(data => {
console.log(data)
})
</script>
</body>
</html>
Postman 测试API工具
如果是本地写的接口,也就是localhost类的,在web postman上是不能测试的,只能下载Postman PC应用来测试。
body-parser模块
body-parser为express框架的中间件,其作用就是对post请求的请求体进行解析。
下载使用:
cnpm install body-parser
bodyParser.json( )与bodyParser.urlencoded( )
- limit参数(json):控制请求体最大尺寸
- extended参数(urlencoded):
extended: false:表示使用系统模块querystring来处理,也是官方推荐的
extended: true:表示使用第三方模块qs来处理
从功能性来讲,qs比querystring要更强大,所以这里可以根据项目的实际需求来考虑
详见:https://github.com/expressjs/body-parser/#extended
References
express-session模块
设置Cookie,app.use(session({secret: 'secret key'}));
当参数为secret时候,通过设置的secret字符串,来计算hash值并放在cookie中,使产生的signedCookie防篡改
还有其他的参数:
- name: 设置cookie中,保存session的字段名称,默认为connect.sid
- store: session的存储方式,默认为存放在内存中,我们可以自定义redis等
- genid: 生成一个新的session_id时,默认为使用uid2这个npm包
- rolling: 每个请求都重新设置一个cookie,默认为false
- resave: 即使session没有被修改,也保存session值,默认为true
- saveUninitialized:强制未初始化的session保存到数据库
- secret: 通过设置的secret字符串,来计算hash值并放在cookie中,使产生的signedCookie防篡改
- cookie : 设置存放sessionid的cookie的相关选项
评论区