
前言:使用yapi系统来管理个人项目接口,目标是在个人电脑上而非服务器上搭建一个yapi系统,开机自启动或者手动启动。一开始是使用官网推荐的yapi-cli来搭建,但是坑比较多,node限制在12x,这个显然影响本机环境。然后采用直接运行YApi的源码,利用pm2来运行node服务,最后可以达到预期效果,但是pm2设置了开机自启动影响电脑性能。最后采用docker容器部署,需要的时候手动启动即可,而且部署起来感觉更加简洁,故本文将docker作为推荐部署方式。
一、pm2部署
使用pm2来运行YApi node程序。
下载Yapi源码以及配置Yapi
- 先将node版本切换到
12.18.2,因为过高版本的node不能使用(个人试过高于14.17.就不能使用)。
关于如何切换node版本,参考之前文章nvm的使用

- 然后下载cnpm
npm install -g cnpm --registry=https://registry.npm.taobao.org - 然后下载yapi:
cnpm install -g yapi-cli
- 在文件夹中执行如下命令:
yapi server
- 访问localhost:9090,将页面配置填上即可:
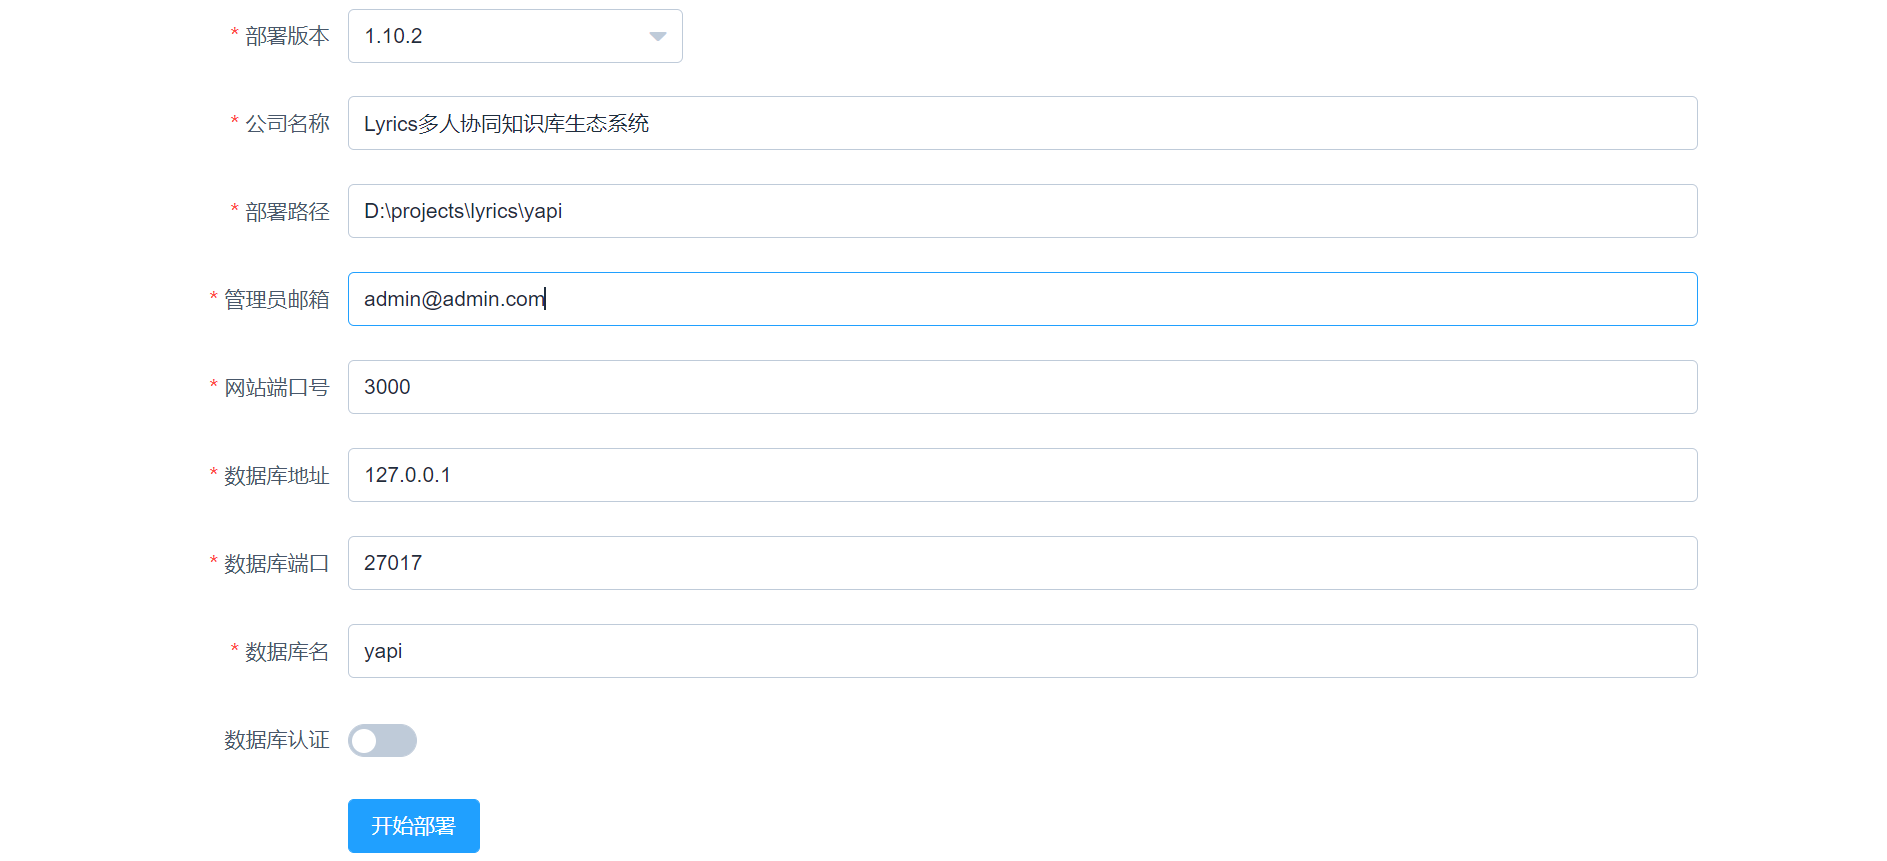
安装成功会有如下信息:
初始化管理员账号成功,账号名:"admin@admin.com",密码:"ymfe.org"
部署成功,请切换到部署目录,输入: "node vendors/server/app.js" 指令启动服务器, 然后在浏览器打开 http://127.0.0.1:3000 访问
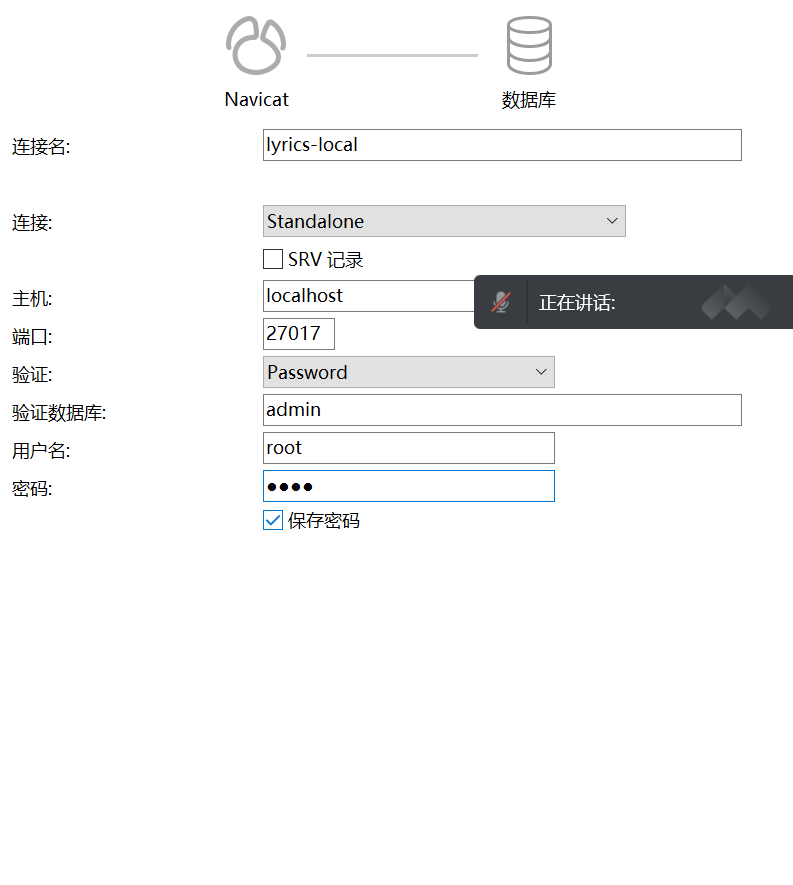
创建本地MongoDB数据库
db.createUser({user: 'root',pwd: 'root',roles:[{role: 'root',db: 'admin'}]})
> use admin
switched to db admin
> db.createUser({user: 'root',pwd: 'root',roles:[{role: 'root',db: 'admin'}]})
Successfully added user: {
        "user" : "root",
        "roles" : [
                {
                        "role" : "root",
                        "db" : "admin"
                }
        ]
}
> show users
{
        "_id" : "admin.root",
        "userId" : UUID("f47c99bb-2df6-410c-bde1-2f424d0258d3"),
        "user" : "root",
        "db" : "admin",
        "roles" : [
                {
                        "role" : "root",
                        "db" : "admin"
                }
        ],
        "mechanisms" : [
                "SCRAM-SHA-1",
                "SCRAM-SHA-256"
        ]
}
找到 MongoDB 安装目录,打开 mongod.cfg文件修改
重启mongodb
C:\Users\wztli>mongo
MongoDB shell version v5.0.5
connecting to: mongodb://127.0.0.1:27017/?compressors=disabled&gssapiServiceName=mongodb
Implicit session: session { "id" : UUID("6ff518c1-21c7-4d6f-98ce-23b12c925321") }
MongoDB server version: 5.0.5
================
Warning: the "mongo" shell has been superseded by "mongosh",
which delivers improved usability and compatibility.The "mongo" shell has been deprecated and will be removed in
an upcoming release.
For installation instructions, see
https://docs.mongodb.com/mongodb-shell/install/
================
> use admin
switched to db admin
> db.auth('root','root')
1
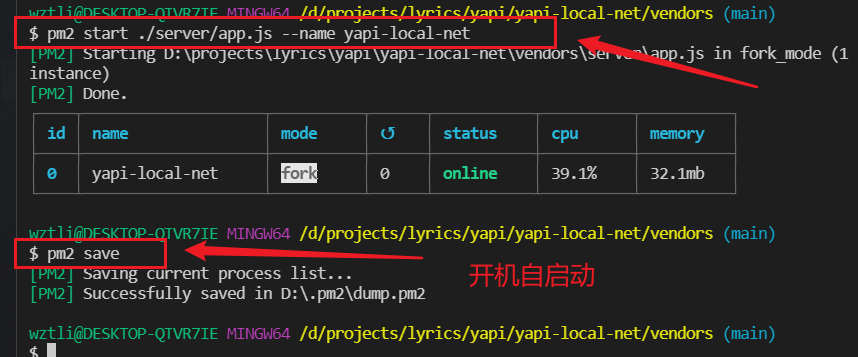
YApi node程序运行成功

pm2后台管理Yapi进程
pm2就相当于之前服务器使用的screen,新开一个进程,就算关掉cmd也能进行操作

这样就是在本地电脑上,可以把项目关掉,但是该项目还处于运行当中,当然了,重启电脑还是要重新执行上面的pm2命令的,也可以进行pm2开机自启动一些项目,具体参考上面的教程链接。
pm2设置开机自启动服务
目的是电脑一开机就会自动重启该服务:
cnpm i -g pm2-windows-service
相关报错
Error: (node:2304) Warning: Accessing non-existent property……
Error:  (node:2304) Warning: Accessing non-existent property 'count' of module exports inside circular dependency
(Use `node --trace-warnings ...` to show where the warning was created)
- 原因node版本过高:https://github.com/YMFE/yapi/issues/1736
events.js:292 throw er; // Unhandled 'error' event
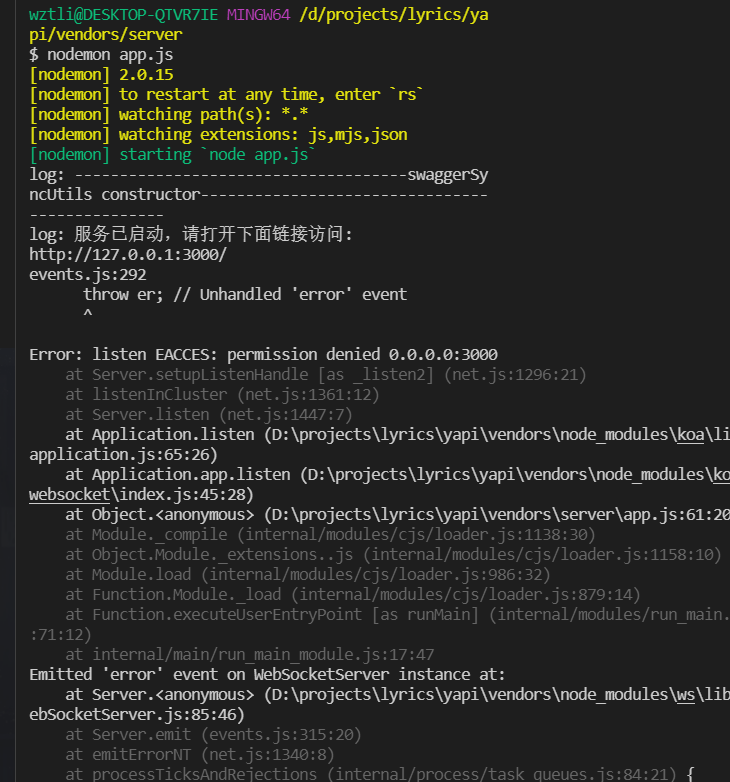
下载gyp试试,需要电脑上的环境参考:https://github.com/nodejs/node-gyp#on-windows
cnpm install -g node-gyp
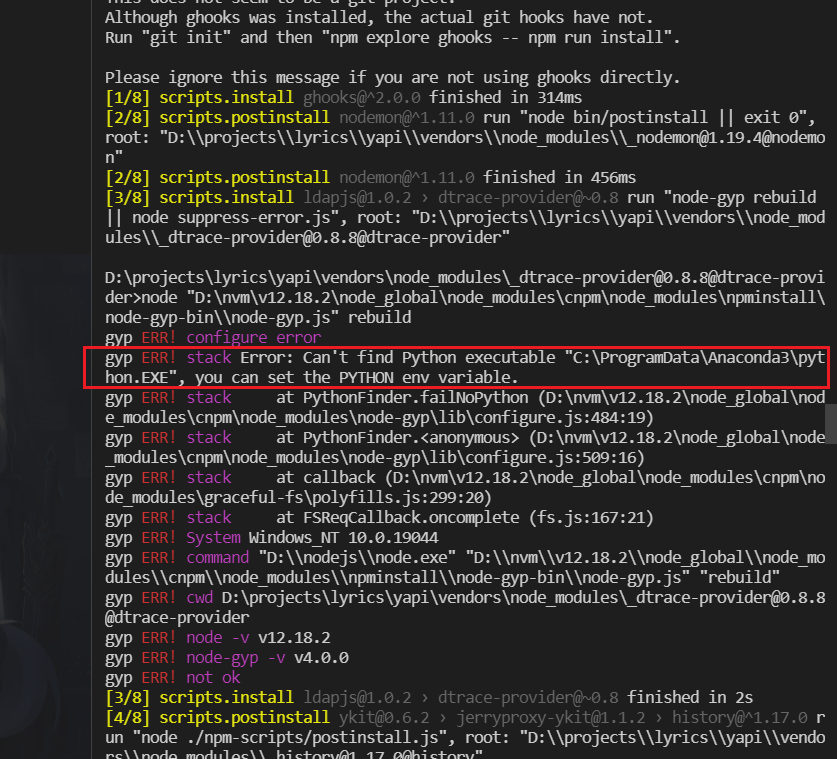
Error: Can‘t find Python executable “python“, you can set the PYTHON env variable
成功安装之后,cnpm i 会有一个报错:
解决参考:
下载:
npm install --global --production windows-build-tools
MongoNetworkError: Authentication failed., mongodb Authentication failed
添加admin值即可
二、docker部署
docker部署主要参考:https://github.com/fjc0k/docker-YApi#readme,不过有几个需要注意的点:
- redeme提到的Docker 和 Docker Compose版本不能太久
- MongoDB如果是在线数据库,配置方式采用集群配置字段更加便捷:
version: '3'

services:
  yapi-web:
    image: jayfong/yapi:latest
    container_name: yapi-web
    ports:
      - 40001:3000
    environment:
      - YAPI_ADMIN_ACCOUNT=xxxxxx
      - YAPI_ADMIN_PASSWORD=xxxxxx
      - YAPI_CLOSE_REGISTER=true
      - YAPI_DB_CONNECT_STRING=mongodb+srv://name:password@url/databasename?retryWrites=true&w=majority
      - YAPI_MAIL_ENABLE=false
      - YAPI_LDAP_LOGIN_ENABLE=false
      - YAPI_PLUGINS=[]
    depends_on:
        ···
三、相关链接
YApi参考:
- yapi文档以及安装文档:https://hellosean1025.github.io/yapi/
- YApi 安装可能会出现的问题:https://github.com/YMFE/yapi/issues/16
- docker参考:https://github.com/fjc0k/docker-YApi
- Yapi 本地部署
本地MongoDB创建参考:
pm2相关参考:
评论区