
前言:Vue 是数据驱动视图更新的框架,所以对于组件之间的数据通信非常重要,常见的Vue 组件关系如下:
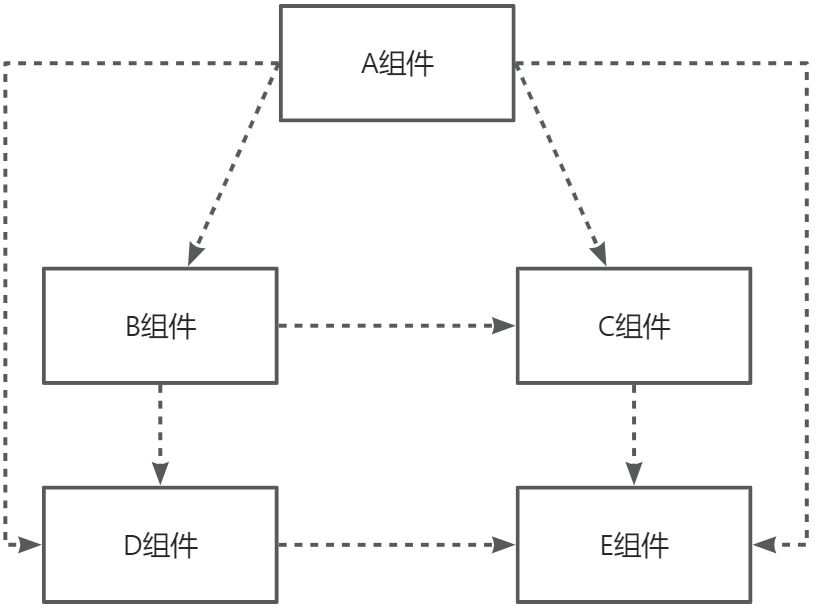
如上图所示, A 与 B、A 与 C、B 与 D、C 与 E 组件之间是父子关系; B 与 C 之间是兄弟关系;A 与 D、A 与 E 之间是隔代关系; D 与 E 是堂兄关系(非直系亲属) 针对以上关系我们归类为:
- 父子组件之间通信
- 非父子组件之间通信 (兄弟组件、隔代关系组件等)
本文介绍组件间(Vue2和Vue3)通信的 8 种方式如下图目录所示:并介绍在不同的场景下如何选择有效方式实现的组件间通信方式。
一、props / $emit
父组件通过props的方式向子组件传递数据,而通过$emit 子组件可以向父组件通信。
vue2
父传子
- prop 只可以从上一级组件传递到下一级组件(父子组件),即所谓的单向数据流。而且 prop 只读,不可被修改,所有修改都会失效并警告
<!-- section父组件 -->
<template>
  <div class="section">
    <com-article :articles="articleList"></com-article>
  </div>
</template>

<script>
import comArticle from ‘./test/article.vue’
export default {
  name: ‘HelloWorld’,
  components: { comArticle },
  data() {
    return {
      articleList: [‘红楼梦’, ‘西游记’, ‘三国演义’]
    }
  }
}
</script>
<!-- 子组件 article.vue -->
<template>
  <div>
    <span v-for="(item, index) in articles" :key="index">{{item}}</span>
  </div>
</template>

<script>
export default {
  props: ['articles']
}
</script>
子传父
<!-- 父组件 -->
<template>
  <div class="section">
    <com-article :articles="articleList" @onEmitIndex="onEmitIndex"></com-article>
    <p>{{currentIndex}}</p>
  </div>
</template>

<script>
import comArticle from ‘./test/article.vue’
export default {
  name: ‘HelloWorld’,
  components: { comArticle },
  data() {
    return {
      currentIndex: -1,
      articleList: [‘红楼梦’, ‘西游记’, ‘三国演义’]
    }
  },
  methods: {
    onEmitIndex(idx) {
      this.currentIndex = idx
    }
  }
}
</script>
<!-- 子组件 -->
<template>
  <div>
    <div v-for="(item, index) in articles" :key="index" @click="emitIndex(index)">{{item}}</div>
  </div>
</template>

<script>
export default {
  props: ['articles'],
  methods: {
    emitIndex(index) {
      this.$emit('onEmitIndex', index)
    }
  }
}
</script>
vue3(选项式)
- 父传子
- 子传父
- 双向响应通信
<!DOCTYPE html>
<html lang="en">
  <head>
    <meta charset="UTF-8" />
    <title>learn vue</title>
    <script src="./vue.global.js"></script>
  </head>
  <body>
    <div id="app">
      <div>parent count: {{count}}</div>
      <my-head
        :title="headerTitle"
        @custom-event="handleCustomEvent"
        v-model="count"
      ></my-head>
    </div>
    <script>
      let app = Vue.createApp({
        data() {
          return {
            headerTitle: "header-title",
            count: "1",
          };
        },
        methods: {
          handleCustomEvent(data) {
            console.log(data);
          },
        },
      });
      // local component
      const HeaderLocalComponent = {
        template: `header-local-component`,
      };
      // global component
      app.component("my-head", {
        props: {
          title: {
            type: String,
          },
          modelValue: {
            type: String,
          },
        }, // or props: ["title"]
        emits: ["custom-event", "update:modelValue"],
        template: `
          <header>
            <h1>{{headTitle}}</h1>
            <p>description</p>
            <p>{{message}}</p>
            <header-local-component></header-local-component>
            <input type="text" :value="modelValue" @input="handleInput" />
          </header>
        `,
        components: {
          HeaderLocalComponent,
        },
        data() {
          return {
            message: "hello world",
            headTitle: this.title, // props data -> responsive...
          };
        },
        mounted() {
          setTimeout(() => {
            this.message = "hello world2";
            this.headTitle = "head change self title...";
            this.$emit("custom-event", {
              info: "child to parent.",
            });
          }, 2000);
        },
        methods: {
          handleInput(e) {
            this.$emit("update:modelValue", e.target.value);
          },
        },
      });
      const vm = app.mount("#app");
    </script>
  </body>
</html>
vue3(组合式)
defineProps和defineEmits
<!-- parent -->
<template>
  <div class="setup-component">
    <setup-component-1
      :propCount="count"
      @emitChangeCount="changeEmitCount"
    ></setup-component-1>
  </div>
</template>

<script setup>
import { ref } from "vue";
import SetupComponent1 from "./SetupComponent1.vue";
const count = ref(0);
const changeEmitCount = (data) => {
  console.warn("value from defineEmits: ", data);
};
</script>
<style>
.setup-component {
  border: 1px solid red;
}
</style>
<!-- son -->
<template>
  <div class="setup-component-1">
    defineProps: {{ propCount }},
    <button @click="changeEmitMethod">defineEmits</button>
  </div>
</template>

<script setup>
  import { defineProps, defineEmits } from "vue";

  const state = defineProps({
    propCount: {
      type: Number,
    },
  });
  const emit = defineEmits(["emitChangeCount"]);
  console.log("setup component 1 state: ", state.propCount);
  const changeEmitMethod = () => {
    emit("emitChangeCount", 111);
  };
</script>

<style>
  .setup-component-1 {
    border: 1px blue solid;
  }
</style>
- 父传子组件的props里面的变量失去响应式,解决办法
<script setup lang="ts">
  import { watch } from 'vue';
  const props = defineProps({
    menuList: {
      type: Array,
      default: () => []
    }
  });

  watch(
    () => […props.menuList],
    (numbers, prevNumbers) => {
      // console.log(‘numbers新值’, numbers);
      // console.log(‘numbers旧值’, prevNumbers);
      console.log(‘____________’, props.menuList.length);
    }
  );
</script>
defineExpose
父组件使用子组件方法
<!-- parent -->
<template>
  <div class="setup-component">
    <setup-component-1 ref="setupComponent1Ref"></setup-component-1>
  </div>
</template>

<script setup>
import { ref } from "vue";
import SetupComponent1 from "./SetupComponent1.vue";
const setupComponent1Ref = ref();
const changeCount = () => {
  console.log(setupComponent1Ref.value); // Proxy
  setupComponent1Ref.value.setupComponent1Method();
};
</script>
<style>
.setup-component {
  border: 1px solid red;
}
</style>
<!-- son -->
<template>
  <div class="setup-component-1">
    ...
  </div>
</template>

<script setup>
import { defineExpose } from "vue";

const setupComponent1Method = () => {
  console.warn("run setup component 1 setupComponent1Method...");
};
defineExpose({
  setupComponent1Method,
});
</script>

<style>
.setup-component-1 {
  border: 1px blue solid;
}
</style>
二、 $children / $parent
vue2
通过$parent和$children就可以访问组件的实例,拿到实例代表什么?代表可以访问此组件的所有方法和data。接下来就是怎么实现拿到指定组件的实例。
<!-- 父组件中 -->
<template>
  <div class="hello_world">
    <div>{{msg}}</div>
    <com-a></com-a>
    <button @click="changeA">点击改变子组件值</button>
  </div>
</template>

<script>
import ComA from ‘./test/comA.vue’
export default {
  name: ‘HelloWorld’,
  components: { ComA },
  data() {
    return {
      msg: ‘Welcome’
    }
  },
  methods: {
    changeA() {
      // 获取到子组件A
      this.$children[0].messageA = ‘this is new value’
    }
  }
}
</script>
<!-- 子组件中 -->
<template>
  <div class="com_a">
    <span>{{messageA}}</span>
    <p>获取父组件的值为:  {{parentVal}}</p>
  </div>
</template>
<script>
export default {
  data() {
    return {
      messageA: 'this is old'
    }
  },
  computed:{
    parentVal(){
      return this.$parent.msg;
    }
  }
}
</script>
要注意边界情况,如在#app上拿$parent得到的是new Vue()的实例,在这实例上再拿$parent得到的是undefined,而在最底层的子组件拿$children是个空数组。也要注意得到$parent和$children的值不一样,$children 的值是数组,而$parent是个对象
上面两种方式用于父子组件之间的通信, 而使用 props 进行父子组件通信更加普遍;二者皆不能用于非父子组件之间的通信。
三、provide / inject
vue2
provide/inject是vue2.2.0新增的 api, 简单来说就是父组件中通过provide来提供变量, 然后再子组件中通过inject来注入变量。- 这里不论子组件嵌套有多深, 只要调用了
inject那么就可以注入provide中的数据,而不局限于只能从当前父组件的 props 属性中回去数据
假设有三个组件: A.vue、B.vue、C.vue 其中 C 是 B 的子组件,B 是 A 的子组件
<!-- A.vue -->
<template>
  <div>
    <comB></comB>
  </div>
</template>

<script>
  import comB from ‘../components/test/comB.vue’
  export default {
    name: "A",
    provide: {
      for: "demo"
    },
    components:{
      comB
    }
  }
</script>
<!-- B.vue -->
<template>
  <div>
    {{demo}}
    <comC></comC>
  </div>
</template>

<script>
  import comC from '../components/test/comC.vue'
  export default {
    name: "B",
    inject: ['for'],
    data() {
      return {
        demo: this.for
      }
    },
    components: {
      comC
    }
  }
</script>
<!-- C.vue -->
<template>
  <div>
    {{demo}}
  </div>
</template>

<script>
  export default {
    name: "C",
    inject: ['for'],
    data() {
      return {
        demo: this.for
      }
    }
  }
</script>
vue3(选项式)
<script>
export default {
  name: "HelloWorld",
  data() {
    return {
      provideData: "HelloWorldMsg",
    };
  },
  provide() {
    return {
      provideData: this.provideData,
      getData(data) {
        console.warn("getData: ", data);
      },
    };
  },
};
</script>
<script>
export default {
  name: "component-1",
  inject: ["provideData", "getData"],
  mounted() {
    this.getData("3333333333");
  },
};
</script>
vue3(组合式)
- provide注入,inject接收,注入响应式数据,inject也同样响应式
- 如果在inject接收的组件中修改响应式数据,也是生效的,但是不推荐,会造成通信数据混乱,如果要实现这种效果,推荐将响应式变量传入的时候加一个readonly同时注入一个修改响应式变量的回调函数来实现
<template>
  <div class="setup-component">
    <h3>setup component:</h3>
    <button @click="changeCount">change</button>
    <p>count: {{ count }}</p>
    <setup-component-1></setup-component-1>
  </div>
</template>

<script setup>
import { ref, readonly } from "vue";
import SetupComponent1 from "./SetupComponent1.vue";
const count = ref(0);
provide("count", readonly(count));
provide("changeCount", changeCount);
</script>
<style>
.setup-component {
  border: 1px solid red;
}
</style>
<template>
  <div class="setup-component-1">
    <button @click="changeCount">change count from inject component</button>
    {{ count }}
  </div>
</template>

<script setup>
import { inject } from "vue";
const count = inject("count");
const changeCount = inject("changeCount");
</script>
<style>
.setup-component-1 {
  border: 1px blue solid;
}
</style>
四、$ref / $refs
- v-for 用于元素或组件时,引用信息将是包含 DOM 节点或组件实例的数组,按照这个理解,可以直接利用$refs来获取dom元素
this.$refs.addAlert.style.display = "block";
- $refs只会在组件渲染完成之后生效,并且它们不是响应式的。这仅作为一个用于直接操作子组件的“逃生舱”——你应该避免在模板或计算属性中访问$refs。这是官方说法,提倡props来操作,缺点就是非响应式的
- ref 本身是作为渲染结果被创建的,在初始渲染的时候你不能访问它们 - 它们还不存在!$refs 也不是响应式的,因此你不应该试图用它在模板中做数据绑定。
vue2
ref:如果在普通的 DOM 元素上使用,引用指向的就是 DOM 元素;如果用在子组件上,引用就指向组件实例,可以通过实例直接调用组件的方法或访问数据, 我们看一个ref 来访问组件的例子:
<!-- 父组件 app.vue -->
<template>
  <component-a ref="comA"></component-a>
</template>

<script>
  export default {
    mounted () {
      const comA = this.$refs.comA;
      console.log(comA.name);  // Vue.js
      comA.sayHello();  // hello
    }
  }
</script>
<!-- 子组件 A.vue -->
<template>
  <div></div>
</template>

<script>
  export default {
    data () {
      return {
        name: 'Vue.js'
      }
    },
    methods: {
      sayHello () {
        console.log('hello')
      }
    }
  }
</script>
和v-for共使用
遇到过这个场景,在父组件里面需要多次渲染子组件
<template>
  <!-- 直播绑定 -->
  <div slot="liveBind">
    <AddLiveBindItem
      v-for="(data, index) in datas"
      :key="data.id"
      :dataConfig="data.dataConfig"
      :isFirst="index === 0 ? true : false"
      :liveBindId="
      index === 0
      ? 1
      : index === 1
      ? 2
      : index === 2
      ? 3
      : index === 3
      ? 4
      : index === 4
      ? 5
      : 6
      "
      @toDeleteLiveBind="toDeleteLiveBind(index)"
      ref="addLiveBindRef"
      />
  </div>
</template>
具体使用:下面第四行代码
this.datas.forEach((_it, index) => {
  // 当前表单的配置项遍历上传
  liveRelationList.push(
    this.$refs.addLiveBindRef[index].liveBindApiParams
  )
  // 上传sort参数
  liveRelationList[liveRelationList.length - 1].sort = _it.id
})
五、eventBus
eventBus又称为事件总线,在 vue 中可以使用它来作为沟通桥梁的概念, 就像是所有组件共用相同的事件中心,可以向该中心注册发送事件或接收事件, 所以组件都可以通知其他组件。- eventBus 也有不方便之处, 当项目较大, 就容易造成难以维护的灾难
1. 初始化
首先需要创建一个事件总线并将其导出, 以便其他模块可以使用或者监听它.
// event-bus.js
import Vue from 'vue'
export const EventBus = new Vue()
假设你有两个组件: additionNum 和 showNum, 这两个组件可以是兄弟组件也可以是父子组件;这里我们以兄弟组件为例:
<template>
  <div>
    <show-num-com></show-num-com>
    <addition-num-com></addition-num-com>
  </div>
</template>

<script>
import showNumCom from ‘./showNum.vue’
import additionNumCom from ‘./additionNum.vue’
export default {
  components: { showNumCom, additionNumCom }
}
</script>
2. 发送事件
<!-- addtionNum.vue 中发送事件 -->
<template>
  <div>
    <button @click="additionHandle">+加法器</button>
  </div>
</template>

<script>
import {EventBus} from ‘./event-bus.js’
console.log(EventBus)
export default {
  data(){
    return{
      num:1
    }
  },
  methods:{
    additionHandle(){
      EventBus.$emit(‘addition’, {
        num:this.num++
      })
    }
  }
}
</script>
3. 接收事件
<!-- showNum.vue 中接收事件 -->
<template>
  <div>计算和: {{count}}</div>
</template>

<script>
import { EventBus } from ‘./event-bus.js’
export default {
  data() {
    return {
      count: 0
    }
  },
  mounted() {
    EventBus.$on(‘addition’, param => {
      this.count = this.count + param.num;
    })
  }
}
</script>
这样就实现了在组件addtionNum.vue中点击相加按钮, 在showNum.vue中利用传递来的 num 展示求和的结果.
4. 移除事件监听者
如果想移除事件的监听, 可以像下面这样操作:
import { eventBus } from 'event-bus.js'
EventBus.$off('addition', {})
六、Vuex
1. Vuex 介绍
Vuex 是一个专为 Vue.js 应用程序开发的状态管理模式。它采用集中式存储管理应用的所有组件的状态,并以相应的规则保证状态以一种可预测的方式发生变化. Vuex 解决了多个视图依赖于同一状态和来自不同视图的行为需要变更同一状态的问题,将开发者的精力聚焦于数据的更新而不是数据在组件之间的传递上
2. Vuex 各个模块
state:用于数据的存储,是 store 中的唯一数据源
getters:如 vue 中的计算属性一样,基于 state 数据的二次包装,常用于数据的筛选和多个数据的相关性计算
mutations:类似函数,改变 state 数据的唯一途径,且不能用于处理异步事件
actions:类似于mutation,用于提交mutation来改变状态,而不直接变更状态,可以包含任意异步操作
modules:类似于命名空间,用于项目中将各个模块的状态分开定义和操作,便于维护
3. Vuex 实例应用
<!-- 父组件 -->
<template>
  <div id="app">
    <ChildA/>
    <ChildB/>
  </div>
</template>

<script>
  import ChildA from ‘./components/ChildA’ // 导入A组件
  import ChildB from ‘./components/ChildB’ // 导入B组件
  export default {
    name: ‘App’,
    components: {ChildA, ChildB} // 注册A、B组件
  }
</script>
<!-- 子组件childA -->
<template>
  <div id="childA">
    <h1>我是A组件</h1>
    <button @click="transform">点我让B组件接收到数据</button>
    <p>因为你点了B,所以我的信息发生了变化:{{BMessage}}</p>
  </div>
</template>

<script>
  export default {
    data() {
      return {
        AMessage: 'Hello,B组件,我是A组件'
      }
    },
    computed: {
      BMessage() {
        // 这里存储从store里获取的B组件的数据
        return this.$store.state.BMsg
      }
    },
    methods: {
      transform() {
        // 触发receiveAMsg,将A组件的数据存放到store里去
        this.$store.commit('receiveAMsg', {
          AMsg: this.AMessage
        })
      }
    }
  }
</script>
<!-- 子组件 childB -->
<template>
  <div id="childB">
    <h1>我是B组件</h1>
    <button @click="transform">点我让A组件接收到数据</button>
    <p>因为你点了A,所以我的信息发生了变化:{{AMessage}}</p>
  </div>
</template>

<script>
  export default {
    data() {
      return {
        BMessage: 'Hello,A组件,我是B组件'
      }
    },
    computed: {
      AMessage() {
        // 这里存储从store里获取的A组件的数据
        return this.$store.state.AMsg
      }
    },
    methods: {
      transform() {
        // 触发receiveBMsg,将B组件的数据存放到store里去
        this.$store.commit('receiveBMsg', {
          BMsg: this.BMessage
        })
      }
    }
  }
</script>
vuex 的store,js
import Vue from 'vue'
import Vuex from 'vuex'
Vue.use(Vuex)
const state = {
  // 初始化A和B组件的数据,等待获取
  AMsg: '',
  BMsg: ''
}

const mutations = {
  receiveAMsg(state, payload) {
    // 将A组件的数据存放于state
    state.AMsg = payload.AMsg
  },
  receiveBMsg(state, payload) {
    // 将B组件的数据存放于state
    state.BMsg = payload.BMsg
  }
}
export default new Vuex.Store({
  state,
  mutations
})
七、localStorage / sessionStorage
这种通信比较简单, 缺点是数据和状态比较混乱, 不太容易维护。 通过window.localStorage.getItem(key)获取数据 通过window.localStorage.setItem(key,value)存储数据
注意用JSON.parse() / JSON.stringify() 做数据格式转换(localStorage和sessionStorage只能存字符串,会自动调用对象的toString方法)
localStorage / sessionStorage可以结合vuex, 实现数据的持久保存, 同时使用 vuex解决数据和状态混乱问题.
// 存取
sessionStorage.setItem(
  'sortColumn',
  JSON.stringify({ prop: column.prop, order: column.order })
)

// 使用
this.sortColumnSession = JSON.parse(
    sessionStorage.getItem(‘sortColumn’)
)
八 $attrs与 $listeners
现在我们来讨论一种情况, 我们一开始给出的组件关系图中 A 组件与 D 组件是隔代关系, 那它们之前进行通信有哪些方式呢?
- 使用
props绑定来进行一级一级的信息传递, 如果 D 组件中状态改变需要传递数据给 A, 使用事件系统一级级往上传递
- 使用
eventBus, 这种情况下还是比较适合使用, 但是碰到多人合作开发时, 代码维护性较低, 可读性也低
- 使用 Vuex 来进行数据管理, 但是如果仅仅是传递数据, 而不做中间处理, 使用 Vuex 处理感觉有点大材小用了.
在vue2.4中,为了解决该需求,引入了$attrs 和$listeners , 新增了inheritAttrs 选项。 在版本 2.4 以前,默认情况下, 父作用域中不作为 prop 被识别 (且获取) 的特性绑定 (class 和 style 除外),将会 “回退” 且作为普通的 HTML 特性应用在子组件的根元素上。接下来看一个跨级通信的例子:
<!-- app.vue -->
<!-- index.vue -->
<template>
  <div>
    <child-com1
      :name="name"
      :age="age"
      :gender="gender"
      :height="height"
      title="程序员成长指北"
    ></child-com1>
  </div>
</template>

<script>
const childCom1 = () => import("./childCom1.vue");
export default {
  components: { childCom1 },
  data() {
    return {
      name: "zhang",
      age: "18",
      gender: "女",
      height: "158"
    };
  }
};
</script>
<!-- childCom1.vue -->
<template class="border">
  <div>
    <p>name: {{ name}}</p>
    <p>childCom1的$attrs: {{ $attrs }}</p>
    <child-com2 v-bind="$attrs"></child-com2>
  </div>
</template>

<script>
  const childCom2 = () => import("./childCom2.vue");
  export default {
    components: {
      childCom2
    },
    inheritAttrs: false, // 可以关闭自动挂载到组件根元素上的没有在props声明的属性
    props: {
      name: String // name作为props属性绑定
    },
    created() {
      console.log(this.$attrs);
      // { "age": "18", "gender": "女", "height": "158", "title": "程序员成长指北" }
    }
  };
</script>
<!-- childCom2.vue -->
<template>
  <div class="border">
    <p>age: {{ age}}</p>
    <p>childCom2: {{ $attrs }}</p>
  </div>
</template>

<script>
  export default {
    inheritAttrs: false,
    props: {
      age: String
    },
    created() {
      console.log(this.$attrs);
      // { "gender": "女", "height": "158", "title": "程序员成长指北" }
    }
  };
</script>
总结
常见使用场景可以分为三类:
- 父子组件通信:
props;$parent/$children;provide/inject;ref;$attrs/$listeners
- 兄弟组件通信:
eventBus; vuex
- 跨级通信:
eventBus;Vuex;provide/inject、$attrs/$listeners
评论区