
一、整体思路

- 【1】利用
npm插件yuque-hexo-lyrics将语雀云端的文章同步到博客源码source/_posts文件夹下。 - 【2】再利用
GitHub Actions自动化部署将GitHub私有仓库(website)的博客源文件编译成静态博客文件并部署push到静态博客仓库(wztlink1013.github.io)下。
但是以上【1】【2】两种方式并不能解决语雀一发布文章就触发GitHub源码仓库的GitHub Actions
- 【3】所以需要中间
TencentCloud云函数/Aliyun云函数,云函数的作用就是,语雀文章一经正式发布就触发云函数,从而云函数再触发GitHub私有的源码仓库下的GitHub Actions达到编译静态博客的效果。
二、网站源文件配置
插件npm地址【暂未GitHub开源】:https://www.npmjs.com/package/yuque-hexo-lyrics
yuque-hexo-lyrics插件使用
本人基于yuque-hexo项目修改的进阶插件
【1】在开发环境当中下载插件(全局安装)
npm i -g yuque-hexo-lyrics
【2】相关hexo命令
yuque-hexo-lyrics clean # 清缓存删除yuque文件夹 删除yuque.json文件(更新之后的插件不删除yuque.json)
yuque-hexo-lyrics sync # 从云端拉取到本地
【3】特别需要注意的是:开发环境语雀Token变量的传入
语雀为了防止用户恶意多次拉取数据,出于对知识库安全性的调整,使用第三方 API 访问知识库,需要传入环境变量 YUQUE_TOKEN,如果是本地使用建议使用环境变量,也可以是终端的方式输入。
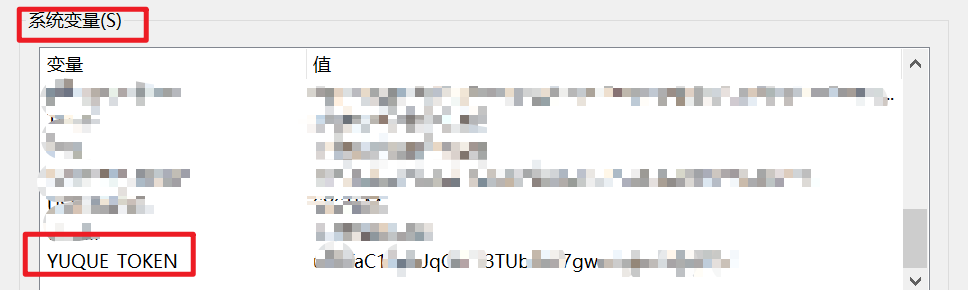
如果是在GitHub Actions里面的环境执行yuque-hexo-lyrics sync命令的时候,通过如下命令传入语雀的token
YUQUE_TOKEN=${{ secrets.YUQUE_TOKEN }} yuque-hexo sync
【4】最后的配置样式(本插件可以同时下载多个知识库)
  "yuqueConfig_blog": {
    "baseUrl": "https://www.yuque.com/api/v2",
    "login": "wztlink1013",
    "repo": "blog",
    "postPath": "source/_posts/blog",
    "cachePath": "yuque_blog.json",
    "mdNameFormat": "slug",
    "onlyPublished": false,
    "onlyPublic": false,
    "adapter": "hexo",
    "timeout": "150s"
  },
  "yuqueConfig_essay": {
    "baseUrl": "https://www.yuque.com/api/v2",
    "login": "wztlink1013",
    "repo": "essay",
    "postPath": "source/_posts/essay",
    "cachePath": "yuque_essay.json",
    "mdNameFormat": "slug",
    "onlyPublished": false,
    "onlyPublic": false,
    "adapter": "hexo",
    "timeout": "150s"
  },
  "yuqueConfig_dsal": {
    "baseUrl": "https://www.yuque.com/api/v2",
    "login": "wztlink1013",
    "repo": "dsal",
    "postPath": "source/_posts/blog",
    "cachePath": "yuque_dsal.json",
    "mdNameFormat": "slug",
    "onlyPublished": false,
    "onlyPublic": false,
    "adapter": "hexo",
    "timeout": "150s"
  },
  "yuqueConfig_javascript": {
    "baseUrl": "https://www.yuque.com/api/v2",
    "login": "wztlink1013",
    "repo": "javascript",
    "postPath": "source/_posts/blog",
    "cachePath": "yuqueConfig_javascript.json",
    "mdNameFormat": "slug",
    "onlyPublished": false,
    "onlyPublic": false,
    "adapter": "hexo",
    "timeout": "150s"
  },
  "scripts": {
    "build": "hexo generate",
    "clean": "hexo clean",
    "deploy": "hexo deploy",
    "server": "hexo server"
  }
更详细使用参考官方官方仓库。
GitHub Actions文件的配置
在博客源文件夹下新建如下GitHub Actions文件
.github/workflows/main.yml
文件内容配置如下
# workflow name
name: website to wztlink1013.github.io CI/CD

on: [repository_dispatch, watch]
jobs:
  Deploy-Pages:
    name: website to wztlink1013.github.io
    runs-on: ubuntu-latest
steps:
# check it to your workflow can access it
# from: https://github.com/actions/checkout
- name: Checkout Repository master branch
  uses: actions/checkout@main
# from: https://github.com/actions/setup-node
- name: Setup Node.js 10.x
  uses: actions/setup-node@main
  with:
    node-version: "10.x"

- name: add Git infomations
  run: |
    git config --global user.name '${{secrets.GIT_NAME}}'
    git config --global user.email '${{secrets.GIT_EMAIL}}'

- name: submit commit infomations
  run: |
    git log --pretty=format:"%s from Github Actions at `date +"%Y-%m-%d %H:%M:%S"`" --date=short -n 1  > commit-message.log

- name: npm istall hexo-cli、yuque-hexo、*
  env:
    YUQUE_TOKEN: ${{ secrets.YUQUE_TOKEN }}
  run: |
    npm install hexo-cli -g
    npm install yuque-hexo-lyrics -g
    npm install

- name: generate articles
  run: |
    hexo clean
    yuque-hexo-lyrics clean
    YUQUE_TOKEN=${{ secrets.YUQUE_TOKEN }} yuque-hexo-lyrics sync
    hexo generate

- name: push wztlink1013.github.io repository
  env:
    Github_Pages: github.com/wztlink1013/wztlink1013.github.io
    Github_Token: ${{ secrets.token_GithubAPI }}
  run: |
    git clone https://${Github_Token}@${Github_Pages} .github_pages
    mv .github_pages/.git/ ./public/
    cd ./public/
    git add .
    git commit -F ../commit-message.log
    git push --force --quiet "https://${Github_Token}@${Github_Pages}" master:master
三、Serverless云函数配置
腾讯云serverless
python2.7的配置
# -*- coding: utf8 -*-
import requests

def main_handler(event, context):
    r = requests.post("https://api.github.com/repos/wztlink1013/website/dispatches",
    json={‘event_type’: "run-it"},
    headers = {"User-Agent":’curl/7.52.1’,
              ‘Content-Type’: ‘application/json’,
              ‘Accept’: ‘application/vnd.github.everest-preview+json’,
              ‘Authorization’: ‘token ***********’})
if r.status_code == 204:
    return "This's OK!"
else:
    return r.status_code
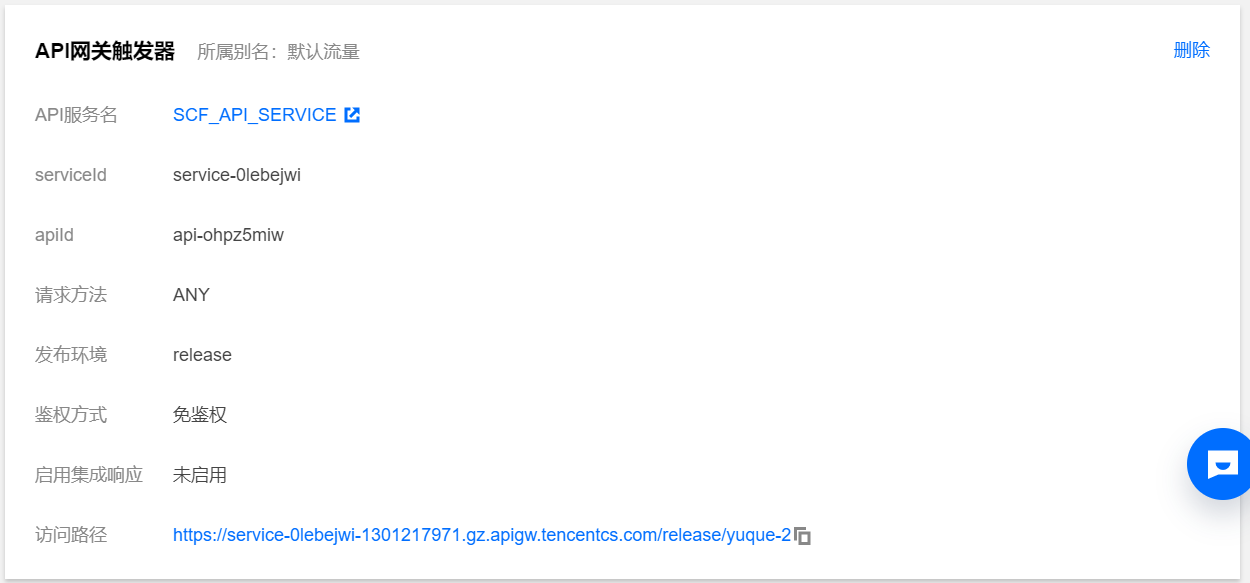
触发器的设置
阿里云serverless
记录一下Hexo自动化部署过程中阿里云平台的原函数配置的python代码
python2.7
# -*- coding: utf-8 -*-
import logging
import requests
To enable the initializer feature (https://help.aliyun.com/document_detail/158208.html)
please implement the initializer function as below:
def initializer(context):
logger = logging.getLogger()
logger.info(‘initializing’)
def handler(event, context):
logger = logging.getLogger()
logger.info(‘hello world’)
return ‘hello world’
r = requests.post("https://api.github.com/repos/wztlink1013/blog-source/dispatches",
json={'event_type': "run-it"},
headers = {"User-Agent":'curl/7.52.1',
'Content-Type': 'application/json',
'Accept': 'application/vnd.github.everest-preview+json',
'Authorization': 'token f43964836a33dce244385bc303c8c20adc1bd52194'})
if r.status_code == 204:
return "This's OK!"
else:
return r.status_code
# -- coding: utf8 --
import requests
def main_handler(event, context):
r = requests.post("https://api.github.com/repos/wztlink1013/blog-source/dispatches",
json={‘event_type’: "run-it"},
headers = {"User-Agent":’curl/7.52.1’,
‘Content-Type’: ‘application/json’,
‘Accept’: ‘application/vnd.github.everest-preview+json’,
‘Authorization’: ‘token 144a87bd45e62ff1cf30dc18880787917bc7865417’})
if r.status_code == 204:
return "This’s OK!"
else:
return r.status_code
python3版本
# -*- coding: utf-8 -*-

import logging
import requests
OK = b’ok\n’
def handler(environ, start_response):
    status = ‘200 OK’
    response_headers = [(‘Content-type’, ‘text/plain’)]
    sync_yuque()
    start_response(status, response_headers)
    return [OK]
def sync_yuque():
    requests.post("https://api.github.com/repos/wztlink1013/Blog3.0/dispatches",
    json={‘event_type’: "run-it"},
    headers={"User-Agent":’curl/7.52.1’,
              ‘Content-Type’: ‘application/json’,
              ‘Accept’: ‘application/vnd.github.everest-preview+json’,
              ‘Authorization’: ‘token f43964836a33dce415385bc303c8c20adc1bd52194’})
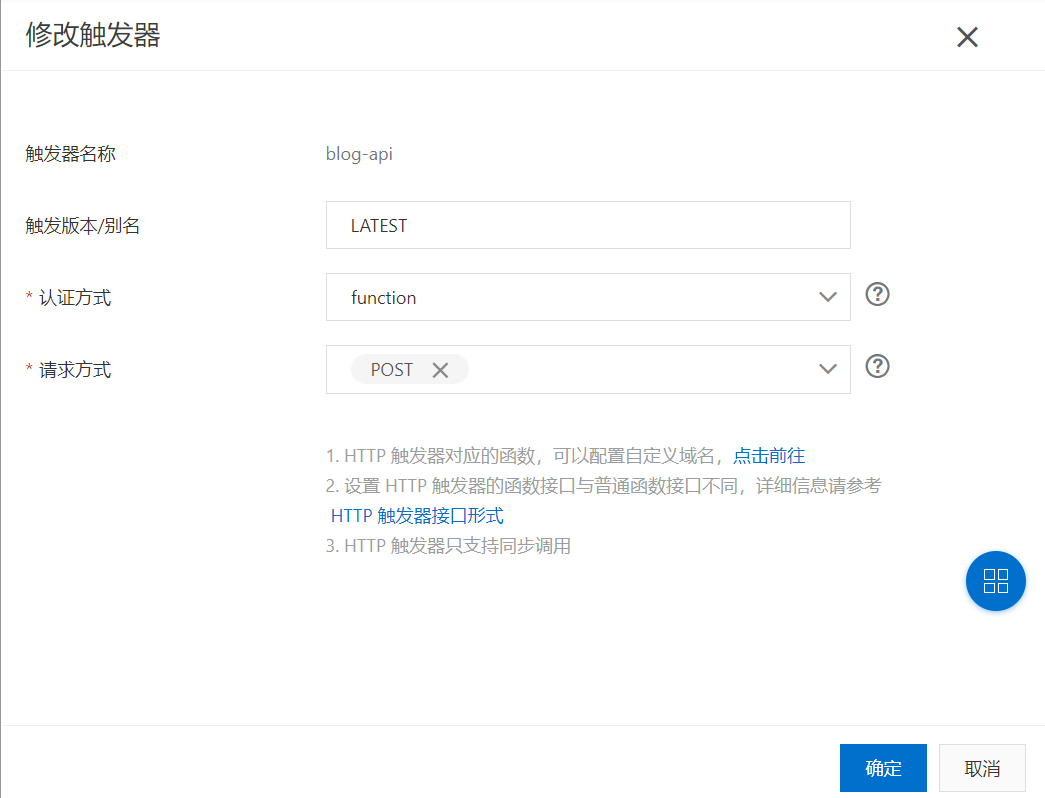
- 触发器配置

【推荐】Vercel的serverless
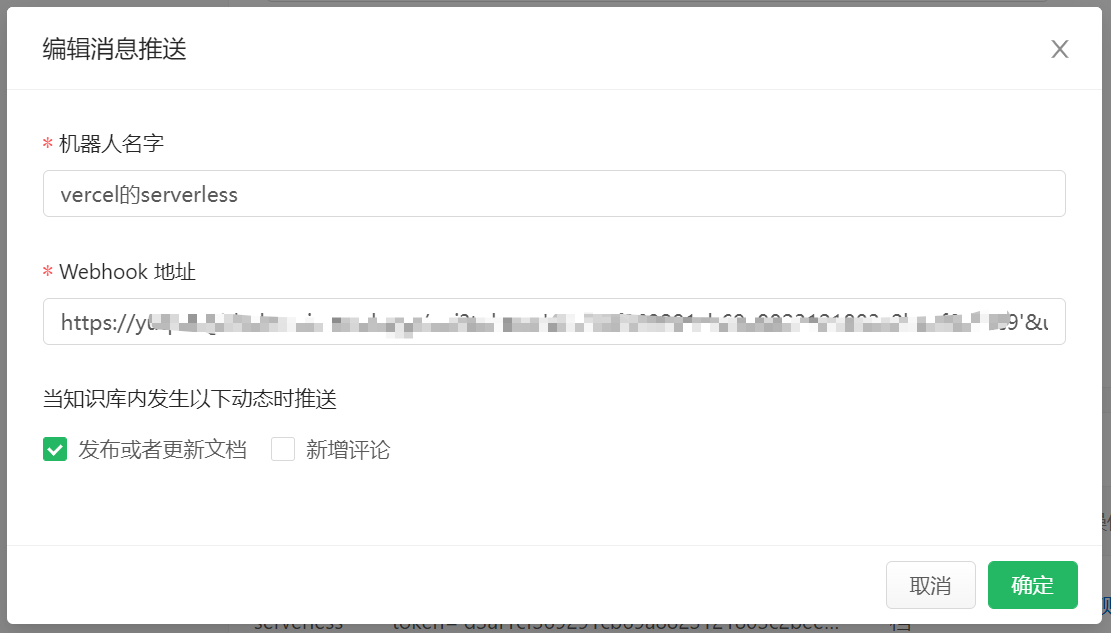
四、语雀云端的配置
在所需要拉取的仓库中webhook中填入云函数所留下的那串网址,勾选所需要触发的选项即可。
评论区