

前言:对Vue3的初次接触是使用Vue3(Vue.js - 渐进式 JavaScript 框架 | Vue.js)的 组合式API 编程风格来进行Vue2旧项目的重构。
基础变动:
- setup:Vue3.1版本是作为选项式的方法,Vue3.2之后才是作为属性放到script上的
- data methods 都不再需要,也不再需要return出变量或是函数
- 路由相关知识,只注意useRoute() useRouter()其余的,和之前自己写的lyrics前端路由就够用了
- Vue3 异步编程
- provide 和 inject
- ······
响应式数据
ref
<template>
  <a-modal
    v-model:visible="visible"
    />
</template>
<script setup lang="ts">
  import {ref} from 'vue'
  const visible = ref<boolean>(false)
</script>
结合DOM或者组件上的ref属性
<template>
  <div class="setup-component">
    <button @click="changeCount">change</button>
    <div ref="divRef"></div>
    <setup-component-1 ref="setupComponent1Ref" ></setup-component-1>
  </div>
</template>

<script setup>
import { ref } from "vue";
import SetupComponent1 from "./SetupComponent1.vue";
const divRef = ref();
const setupComponent1Ref = ref();
const changeCount = () => {
  console.log("divRef: ", divRef);
  console.log("divRef.value: ", divRef.value);
  console.log("setupComponent1Ref: ", setupComponent1Ref);
  console.log("setupComponent1Ref.value: ", setupComponent1Ref.value);
};
</script>

reactive
reactive这个更多使用在对象类型的响应式定义数据toRefs和toRef将reactive响应式转为ref响应式
<template>
  <button @click="changeVar2">改变var2的值</button>
  <div>toRefs: {{ roRefsVar }}</div>
  <div>toRef: {{ var2_1Toref }}</div>
</template>
<script setup>
import { reactive, toRef, toRefs } from 'vue'
// reactive
const var2 = reactive({
  var2_1: 'var2_1 string'
})
const { var2_1: roRefsVar } = toRefs(var2)
const var2_1Toref = toRef(var2, 'var2_1')
const changeVar2 = () => {
  var2.var2_1 += '1'
}
</script>
计算属性和方法
<template>
  <div class="box1">计算属性</div>
  <button @click="changeVar3">改变var3的值</button>
  <div>var3: {{ var3 }}</div>
  <div>var4: {{ var4 }}</div>
</template>
<script setup>
import { ref, computed } from 'vue'
// computed
const var3 = ref(1)
const var4 = computed(() => var3.value * 2)
const changeVar3 = () => (var3.value += 1)
</script>
生命周期
- api:选项式生命周期API前面加on(eg:onBeforeMount,onMounted···)
- 没有onBeforeCreate,onCreated
- 可以多次调用,不用将逻辑写在一个里面
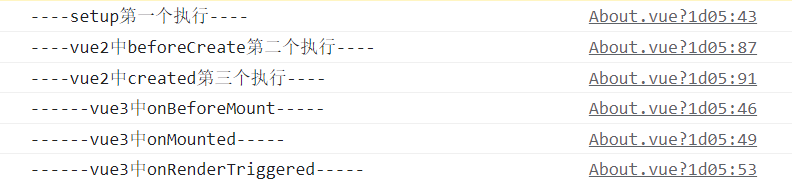
在Vue3组合式API的生命周期里面,没有created阶段了,直接在setup里面了,也就是setup阶段是没有挂载真实DOM的,如果需要操作真实dom需要在onMounetd里面进行相应逻辑
onMounted(() => {
  if (document.getElementById('test')) {
    console.log('exist #test DOM...');
  }
});
<script>
  setup() {
    console.log('----setup第一个执行----')
    // vue3.x生命周期写在setup中
    onBeforeMount(() => {
      console.log('------vue3中onBeforeMount-----')
    })
    onMounted(() => {
      console.log('------vue3中onMounted-----')
    })
    onRenderTriggered((event) => {
      console.log('------vue3中onRenderTriggered-----', event)
    })
  },
  // vue2当中的
  beforeCreate() {
    console.log('----vue2中beforeCreate第二个执行----')
  },
  // vue2当中的
  created() {
    console.log('----vue2中created第三个执行----')
  },
</script>
执行结果如下:
watch
watch(count, (newVal, oldVal) => {
  console.log("watch count: ", newVal, oldVal);
});
watchEffect
- 所依赖的变量发生改变,就会执行,再次写相关逻辑代码
- 执行时机:数据更新后,DOM更新前;通过第二个参数
flush: post可以改变至数据更新后,DOM更新后触发 - 返回的是一个函数,执行该函数,可以停止watchEffect监听
- 传入一个形参,该形参函数所执行时机为更新前和组件卸载前,在此可以写一些清除逻辑
watch和watchEffect
- warchEffect初始化会执行一遍
- 想要明确使用变化前后值
hook
- use函数(通常以use开头命名)封装优于mixins,可以自定义传参等
import { ref, computed } from "vue";
const useXY = () => {
  const x = ref(12);
  const y = computed(() => x.value * 2);
  return { x, y };
};
export { useXY };
<template>
  <p>useXY x: {{ x }}; y: {{ y }}</p>
</template>
<script setup>
  import { useXY } from "./usseXY";
  const { x, y } = useXY();
</script>
生态链
Router
- SPA单页面应用,以及路径模式和哈希模式下的路由
- hash模式
- history模式,和前端较为古老的ajax局部刷新页面类似,都是利用pushState相关技术
<!-- hash模式 -->
<body>
  <ul>
    <!-- 定义路由 -->
    <li><a href="#/home">home</a></li>
    <li><a href="#/about">about</a></li>
    <!-- 渲染路由对应的 UI -->
    <div id="routerView"></div>
  </ul>
</body>
<script>
  window.addEventListener('hashchange', onHashChange)
  onHashChange()
  function onHashChange () {
    switch (location.hash) {
      case '#/home':
        routerView.innerHTML = 'Home'
        break;
      case '#/about':
        routerView.innerHTML = 'About'
        break;
    }
  }
</script>
<!-- history模式 -->
<body>
  <ul>
    <!-- 定义路由 -->
    <li><a href="/home">home</a></li>
    <li><a href="/about">about</a></li>
    <!-- 渲染路由对应的 UI -->
    <div id="routerView"></div>
  </ul>
</body>
<script>
  let linkList = document.querySelectorAll('a[href]')
  for(let i=0;i<linkList.length;i++){
    linkList[i].addEventListener('click', function(e){
      e.preventDefault()
      history.pushState(null, '', this.getAttribute('href'))
      onPopState()
    })
  }
  window.addEventListener('popstate', onPopState)
  onPopState()
  function onPopState () {
    switch (location.pathname) {
      case '/home':
        routerView.innerHTML = 'Home'
        break;
      case '/about':
        routerView.innerHTML = 'About'
        break;
    }
  }
</script>
- 嵌套路由:路由表中嵌套写法
- 动态路由:
$route.params.xxx - 声明式路由:
<RouterLink /> - 编程式路由:
this.$Router.push('/xxx) - 路由元信息:
meta - 路由传递参数
- query方式:相当于路径参数
$route.query - params方式(显式):
$route.params - params方式(隐式):
$route.params
$route,$router
- 前者获取当前路由信息
- 后者调用路由相关方法
import { createRouter, createWebHistory } from 'vue-router'
import HomeView from '../views/HomeView.vue'

const router = createRouter({
  history: createWebHistory(import.meta.env.BASE_URL),
  routes: [
    {
      path: ‘/‘,
      name: ‘home’,
      component: HomeView
    },
    {
      path: ‘/about’,
      name: ‘about’,
      // route level code-splitting
      // this generates a separate chunk (About.[hash].js) for this route
      // which is lazy-loaded when the route is visited.
      component: () => import(‘../views/AboutView.vue’)
    }
  ]
})
export default router
Pinia
Pinia其实就是Vuex 5。与 Vuex相比,Pinia 提供了一个更简单的 API,具有更少的规范,提供了 Composition-API 风格的 API,最重要的是,在与TypeScript 一起使用时具有可靠的类型推断支持。
Pinia API 与 Vuex4有很大不同,即:
- mutations 不再存在。他们经常被认为是 非常冗长。他们最初带来了 devtools 集成,但这不再是问题。
- 无需创建自定义复杂包装器来支持 TypeScript,所有内容都是类型化的,并且 API 的设计方式尽可能利用 TS 类型推断。不再需要注入、导入函数、调用函数、享受自动完成功能!
- 无需动态添加 Store,默认情况下它们都是动态的,您甚至都不会注意到。请注意,您仍然可以随时手动使用 Store 进行注册,但因为它是自动的,您无需担心。
- 不再有 modules 的嵌套结构。您仍然可以通过在另一个 Store 中导入和 使用 来隐式嵌套 Store,但 Pinia 通过设计提供平面结构,同时仍然支持 Store 之间的交叉组合方式。 您甚至可以拥有 Store 的循环依赖关系。
- 没有 命名空间模块。鉴于 Store 的扁平架构,“命名空间” Store 是其定义方式所固有的,您可以说所有 Store 都是命名空间的。
总之Pinia简化了Vuex的操作,这也是未来Vuex5的趋势,下面就来尝试使用一下Pinia吧。
用你最喜欢的包管理器安装 pinia:
npm install pinia
vue引入pinia:
import { createPinia } from 'pinia'
const pinia = createPinia()
createApp(App).use(pinia).mount('#app')
组合式写法:
import { ref, computed } from 'vue'
import { defineStore } from 'pinia'

export const useCounterStore = defineStore(‘counter’, () => {
  const count = ref(0)
  const doubleCount = computed(() => count.value * 2)
  function increment() {
    count.value++
  }
  return { count, doubleCount, increment }
})
选项式写法:
import { defineStore } from 'pinia'

export const useCounterStore = defineStore(‘counterStore’, {
  state: () => ({
    counter: 0
  }),
  actions: {
    add(){
      this.counter++
    }
  }
})
以上两种风格的写法是等价的,接下来就是如何去调用这个模块了。在App.vue中引入counter.js并使用:
<template>
  <button @click="changePiniaValue">change pinia value</button>
  {{ count }}, {{ doubleCount }}
</template>
<script setup>
  import { storeToRefs } from 'pinia';
  import { useCounterStore } from './stores/counter';

  const counterStore = useCounterStore()
  // 下面操作可使共享状态具备响应式
  const { counter, doubleCount } = storeToRefs(counterStore);
  //下面四种操作行为均可修改counter值,并具备响应式变化
  const changePiniaValue = () => {
    counterStore.increment()
    // counter.value++;
    // counterStore.counter++;
    // counterStore.$patch({
    // counter: counter.value + 1
    // })
  }
</script>
increment()方法可以直接编写异步程序和传参处理:
actions: {
  increment(n){
    setTimeout(()=>{
      this.counter += n;
    }, 1000)
  }
}
Pinia去掉了繁琐的mutations,异步同步都采用actions来完成,并且简化了modules的使用方式等等。
其他
slot使用
vue2:
<template>
  <template slot="content">
    ···
  </template>
</template>
vue3:
<template>
  <slot name="content">
    ···
  </slot>
</template>
全局变量的使用
vue3注册全局变量失去响应性
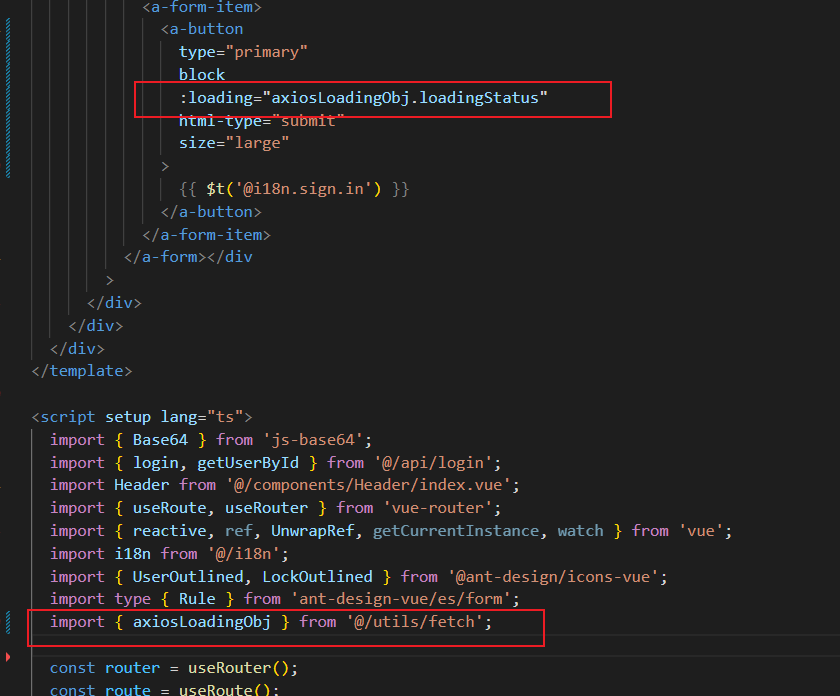
- 点击登录按钮,相应一个loading的状态,这个在之前项目中是利用全局注册的一个变量,vue3的全局注册变量方法
- https://blog.csdn.net/weixin_43090018/article/details/117222606
- https://blog.csdn.net/XKFC1/article/details/123715354
- vue3 怎么创建全局的响应式对象 创建简单的vuex_最有才的河南大汉的博客-CSDN博客
- fetch文件中的axiosLoadingObj变量,在main.ts中注册为全局变量,Login.vue中使用,当fetch中axiosLoadingObj变量的值改变,Login.vue中使用该全局变量不会发生改变。
- 接口 - loading 的全局变量迁移
不能使用v3全局变量api getCurrentInstance 不能响应式,同时打包情况下
直接导入ts文件,在ts文件中做变量导出,
具名插槽
- vue3插槽使用方式和vue2不一样,不能使用template,而是slot标签,name属性
- 具名插槽在vue2和vue3两者使用有差别

根据dom属性来动态改变css
当给dom添加自定义属性,vue2和vue3实际渲染出来的不一样(如果是标签自身属性,vue3和vue2是一样的)
<div :selected="true">selected</div>
<div :selected="false">UnSlected</div>
- vue3实际渲染

//  vue3
div[selected=true] {
  color: red;
}
- vue2实际渲染

// vue2
div[selected] {
  color: red;
}
评论区